



How to Replace an Engine Mount: Step-by-Step Instructions
Quick answer: Replacing an engine mount takes 1–3 hours and requires a jack positioned under the oil pan, or another way to support the engine while it's disconnected. Signs of wear: vibration through the body at startup and at idle, knocking under hard acceleration, and a visibly shifted engine in the bay. PolyPro polyurethane engine mounts last 3–5 times longer than standard rubber mounts.
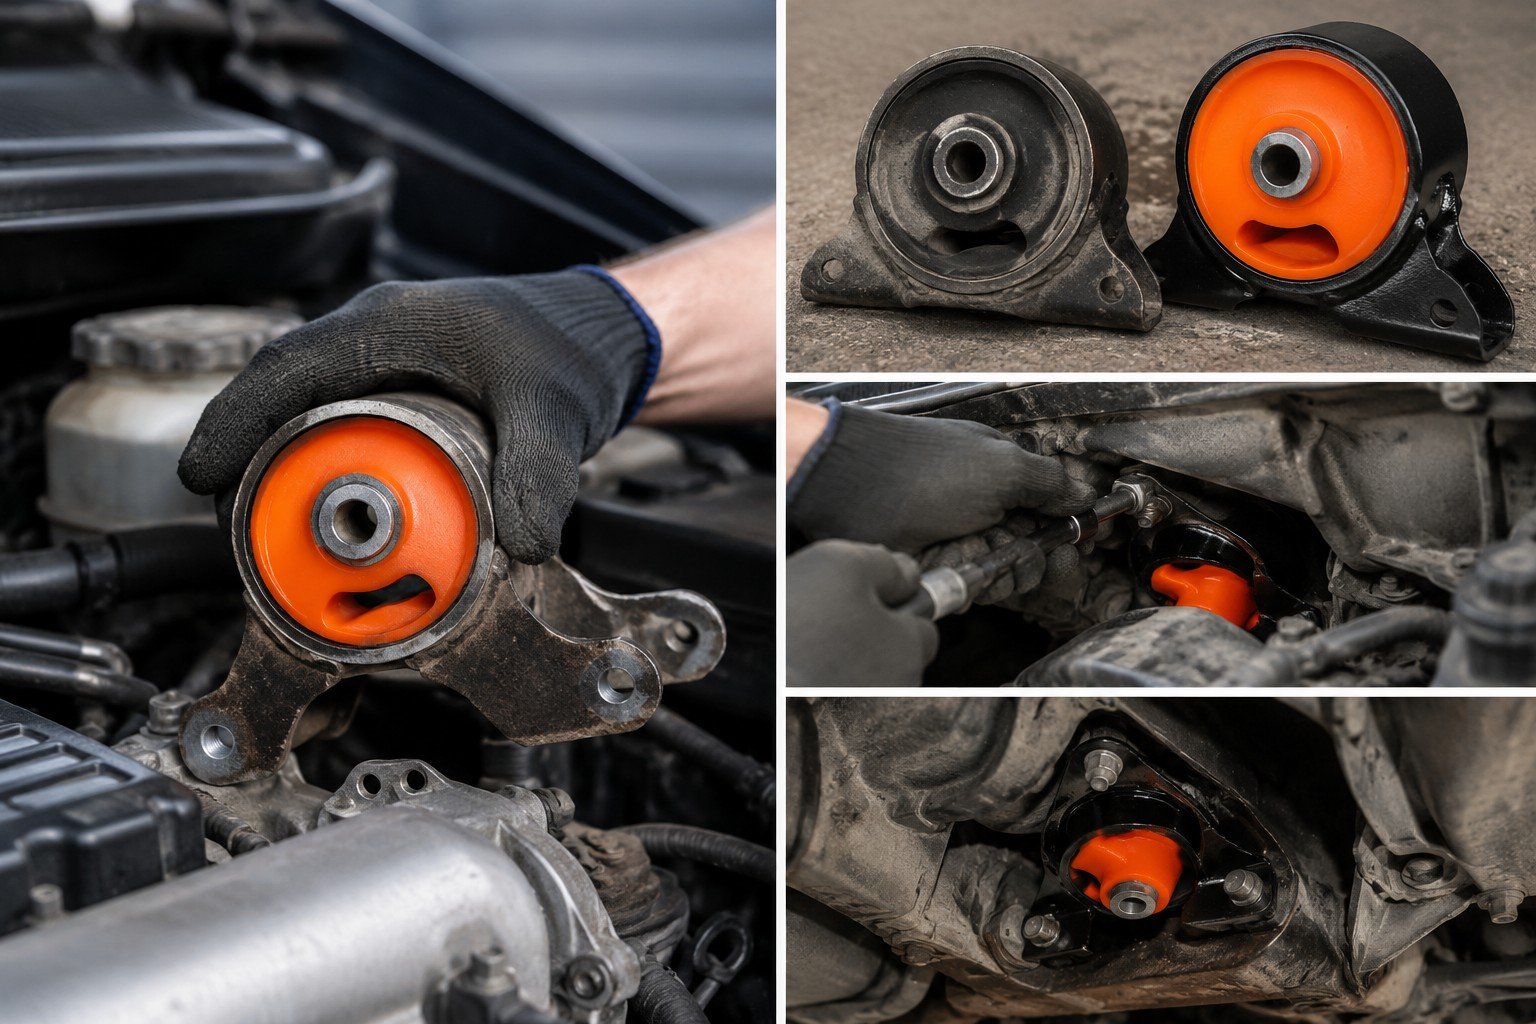
What Is an Engine Mount? Definition and Function
An engine mount (also called an engine support) is the part that attaches the internal combustion engine to the car's body or subframe. It holds the engine in its designed position and absorbs the vibration generated as it runs.
Engine mounts are made either as standard rubber inserts in metal brackets or from polyurethane. Most passenger cars have 3–4 mounts: left, right, front, and rear (the transmission mount). Hydraulic mounts are a more complex design, where a fluid does the work of damping vibration — usually found on premium vehicles. For a closer look at what an engine mount does, see What Is an Engine Mount and Why Do You Need One?
Don't confuse an engine mount with a suspension bushing (silent block) — a related but different part that also uses rubber or polyurethane to absorb vibration, just on the suspension rather than the engine. If you're chasing a noise or a soft feel elsewhere in the chassis, see What Is a Car Bushing? to check whether that's the real cause.
Signs of Wear: How to Tell Your Engine Mounts Need Replacing
Worn engine mounts give clear symptoms — they're hard to miss.
Vibration Through the Body
Strong vibration at startup, at idle, or while driving is the main sign of worn engine mounts. Standard rubber mounts can no longer isolate the vibration from the engine, so the whole body "shakes" along with it. You'll feel it in the steering wheel, the floor, and the seat.
Knocking Under Acceleration
A distinct knock when you press or release the gas pedal sharply is a sign the engine has excessive play in its mounts. Under hard acceleration, the engine "jumps" and hits the body or nearby components in the engine bay. Knocking when the engine is switched off also points to worn engine mounts.
A Visibly Shifted Engine
If you can see that the engine is sitting unevenly or has shifted to one side, the mounts are no longer holding it in its designed position. A badly shifted engine risks damage from contact with other components in the bay — hoses, wiring, and body panels.
Reduced Driving Comfort
Increased engine noise in the cabin at idle, and vibration in the pedals and gear lever while the engine runs, are symptoms of early wear that often go unnoticed. The need to replace the engine mounts becomes obvious 10,000–20,000 km (roughly 6,000–12,000 miles) after these signs first appear, when the situation suddenly gets much worse.
We recommend checking your engine mounts at every scheduled maintenance visit — especially after 80,000 km (about 50,000 miles) or after a hard suspension impact.
How to Check Your Engine Mounts Yourself
Two ways to check the condition of your engine mounts without a trip to the shop.
Visual inspection. Look at the mounts from above or below: the rubber element shouldn't show any cracks, tears, or deformation. If you see visible tearing, replace the mount right away. The condition of the engine mounts is easiest to see from underneath, on a lift or over an inspection pit.
Load test. Have a helper press and release the gas pedal sharply in neutral while you watch the engine. If the engine "jumps" or moves more than 1–2 cm (about ⅜–¾ in), the mounts are worn. You can check an engine mount this way in about 5 minutes, with no tools at all.
Tools You'll Need to Replace an Engine Mount
- A jack or a dedicated support for the oil pan (a wood block between the jack and the pan)
- A 15–19 mm box or socket wrench, plus a ratchet with an extension
- A can of WD-40 — for seized mounting bolts
- Jack stands
You don't need a lift to replace an engine mount on most cars — an inspection pit or a support under the pan is enough. On cars where the rear mount is only accessible from below, you'll need a lift or a pit.
How to Replace an Engine Mount: Step-by-Step Instructions
The basic steps for replacing an engine mount are the same on most cars.
Step 1. Prep and Support the Engine
Park the car on level ground and set the parking brake. Place a support, or a jack with a wood block, under the oil pan so the engine can't drop once it's disconnected from the mount. This is a mandatory step before you disconnect anything.
Step 2. Disconnect the Old Mount
Undo the bolts holding the mount to the body (usually 2–3 bolts, 15–17 mm) and the bolts holding it to the engine or subframe. If the bolts are seized, spray them with WD-40 and wait 15 minutes.
Step 3. Lift the Engine
Using the jack under the oil pan, carefully raise the engine 2–4 cm (about ¾–1½ in) — just enough for the old mount to clear its seat. Don't lift it further than that: you risk damaging hoses and wiring.
Step 4. Remove the Old Mount and Install the New One
Take out the old engine mount. Fit the new part squarely, with no twist — installing the mount correctly is critical for smooth engine operation. The new mount should seat precisely into place.
Step 5. Torque and Check
Lower the engine back onto the new mount. Start the bolts by hand, then torque them to the spec in your manual (typically 50–80 Nm, or about 37–59 ft-lb). Check that the mount is seated evenly on both sides. Take the car for a test drive and confirm there's no knocking.
Watch on our channel: Engine Mount Restoration!
Replacing the Front vs. Rear Engine Mount: What's Different
Most cars have 3–4 engine mounts. Replace them one at a time — never disconnect the engine from all its mounts at once.
Replacing the front engine mount is usually the simplest: the part is accessible from above, with no need to lift the car. Mounting bolts are typically 15–17 mm.
Replacing the rear engine mount (the transmission mount) requires access from below and lifting the car. The part sits between the transmission and the subframe. The bolts often seize — spray them with WD-40 ahead of time. Replacing the rear engine mount is harder because of the limited access, but the principle is the same.
If you're replacing both the front and rear mounts, check the side mounts too. All the mounts wear out at roughly the same rate.
A timely mount replacement also protects the engine from premature wear caused by constant vibration. For a step-by-step guide to replacing other suspension parts, see How to Replace Bushings.
Why Switch to Polyurethane Engine Mounts
PolyPro polyurethane engine mounts are an alternative to standard rubber mounts, built for a much longer service life.
- Service life — 150,000–250,000 km (roughly 93,000–155,000 miles), 3–5 times longer
- Resistant to oils, road chemicals, and temperatures from −40°C to +70°C (−40°F to 158°F)
- Precise geometry — doesn't deform under continuous load
- 12-month warranty with no mileage limit
Worn engine mounts pass vibration directly into the body, speeding up wear on nearby suspension components. Repairing engine damage caused by worn mounts costs far more than replacing them on time.
Engine Mount Replacement Cost
| Service | Cost |
|---|---|
| One engine mount (PolyPro part) | from 200 UAH |
| Replacing one mount at a shop (labor) | from 500 UAH |
| Replacing a full set (3–4 pcs.) | from 2,000 UAH (parts + labor) |
Engine mount replacement costs more in Kyiv and other major cities than in the regions. The price also depends on the car's make and how hard the mount is to access. Replacing an engine mount yourself is realistic if you have access to an inspection pit and basic tools.
Where to Buy Engine Mounts
PolyPro polyurethane engine mounts for passenger cars and commercial vehicles — in the catalog at kapot.in.ua. We match parts by make, model, and year, and make them to order by part number or sample. Prices start from 200 UAH per part, with delivery across Ukraine.
Order parts or check availability: (050) 21-35-163, (067) 21-35-163, or message us on Viber.
Отримати консультацію по підбору деталей:
Get a consultation on choosing the right parts:
Получить консультацию по подбору деталей:
VIBER

TELEGRAM